|
|
 |
|
This chapter highlights common programming tasks and techniques illustrated by the HME sample programs. The Java source code for the programs is included in the SDK (hme_sdk_1.3/samples/src/com/tivo/hme/samples). You can also view it online at sourceforge.net/projects/tivohme.
Working with Picture Resources
The sample program Pictures.java allows the user to view a slide show consisting of images stored on a PC and displayed on the television by the TiVo box. This sample illustrates a number of key programming tasks:
Application Framework
The application life cycle shown in this example is
Basic Setup:
Basic Setup
The first step is to create and initialize the application:
public class Pictures extends Application
       implements Ticker.Client

.
.
.
public void init(IContext context) throws Exception
    {
        super.init(context);
        list = ((PicturesFactory)getFactory()).list;

        // save the root view for later
        root = getRoot();

        // create the bg first, because it's behind the fg
        bg = new View(root, 0, 0, root.getWidth(),
                      root.getHeight());
        fg = new View(root, 0, 0, root.getWidth(),
                      root.getHeight());

        Ticker.master.add(this, System.currentTimeMillis(),
                          null);
    }
}
Pictures Factory
This example shows how to create and use a factory to initialize data that is shared between multiple running instances of your application. Whenever HME launches an application, it checks whether any factories exist and, if found, runs them automatically. The Pictures factory in this example obtains a command line argument (the directory containing the images for the slide show) and builds a global list of pictures by scanning all pictures in the specified directory. This list exists as long as the application continues to run on the PC. The application obtains the list of pictures from the Pictures factory in its init method. When the application quits (isApplicationClosing()), the slide show ends.
Setting Up Views
Views are created back to front. This application sets up two views, a background view and a foreground view. An image is first loaded into the foreground view. Next, it is moved into the background view, where it gradually morphs into the new (foreground) image, as described in the “Animating Images” section.
The root view, the parent of all views in the application, is created by the system and contains the size and resolution of the TV screen. Rather than hard-coding the size of the views in your application, you can obtain the coordinates of the current system from the root view (by using root.getWidth and root.getHeight), as shown in this example.
Starting the Master Timer
The Ticker class is a master timer built into the HME SDK. Applications can use this mechanism to obtain callbacks from the system at regular intervals. Here, the init() method sets the master ticker to fire off immediately (by obtaining the current time, currentTimeMillis). If this line of code were omitted, the master ticker would never fire, and the screen would remain black:
“this” indicates that this class (the application) implements Ticker.Client (see “Implementing the Ticker.Client Interface”).
Adding Resources
Resources are added to the views later in the program, in the showPicture method. In this example, the resources are the images for the slide show.
Event Model
This example does not use standard asynchronous HME event handling. Instead, the slide show is driven by the tick() method, which is contained in the Ticker.Client interface and implemented here.
Implementing the Ticker.Client Interface
The tick method is the heartbeat of the Pictures application:
public long tick(long tm, Object arg)
    {
        // Check to see if the application has closed down
        // and return -1 so the ticker doesn't re-register us.

        if (isApplicationClosing()) {
            return -1;
        }

        // advance to the next picture and show it
        index = (index + 1) % list.size();
        showPicture((String)list.get(index));

        // Since tick is called from another thread call flush
        // to force hme to write out any pending commands.
        flush();

        // tick again to advance to the next frame
        return System.currentTimeMillis() + SHOW_TIME;
    }
The ticker checks to be sure that the application is still running. If it is, the ticker steps to the next picture in the list and calls showPicture().
flush Method
When you are running in your own thread—that is, any thread that runs outside of the HME event dispatcher—be sure to call flush() to ensure that all of the HME commands you’ve generated actually get sent. Otherwise, commands continue to be buffered, and the changes may not take effect when you expect them to.
Showing Pictures
The showPicture method contains the code for animating from one picture to the next:
void showPicture(String path)
{
   // turn painting off while we twiddle things
   root.setPainting(false); //see init() method for getRoot()
   try {
   // move the current image to the background view for
   // fading out
      bg.setResource(fg.getResource(), RSRC_IMAGE_BESTFIT);

      // get a scaled instance of the image
      Image img = getScaledImage(path, getWidth(),
                                 getHeight());

      // stuff the scaled image into the fg
      fg.setResource(createImage(img), RSRC_IMAGE_BESTFIT);

      // Perform the CROSS FADE
      Resource anim = getResource("*" + FADE_TIME);
      fg.setTransparency(1.0f); // start transparent,
                                // then fade IN
      fg.setTransparency(0.0f, anim);
      bg.setTransparency(0.0f); // start opaque,
                                // then fade OUT
      bg.setTransparency(1.0f, anim);
   } finally {
        root.setPainting(true);
     }
}
At the start, it turns off painting of the screen:
When you are performing many changes at once, it’s best to turn off painting until all changes have been sent. Otherwise, the screen will flicker as each successive paint command is received and carried out.
Note that showPicture has a try block, but no catch. Even if there is an error, you still want to turn on the screen, so the finally block ensures that something will appear on the screen:
Animating Images
This example illustrates an animation effect called a cross-fade, which uses transparency to blend between foreground and background views. The current view fades out as the new one fades in, which creates a smooth and pleasing transition.
The first image is loaded into the foreground. Then it is moved to the background, and the second image is placed in the foreground. The transparency flag for the foreground is set to fade from transparent (1) to opaque (0), which makes it visible. Conversely, the transparency flag for the background is set to change from opaque (0) to transparent (1), which makes it disappear from the screen.
Cross-fades consume twice the amount of memory as a single image display. See “Rendering Constraints” for a caveat regarding use of cross-fades with full-screen images.
Scaling Images
The getScaledImage() method shows loading an image from disk as a Java image class, modifying the image in memory (scaling it if it is larger than the maximum HME full-screen image size of 640 x 480), then handing the image back to HME. The sample uses standard Java code to load the image and scale it down.
Note: You can use images larger than 640 x 480, but they will be clipped to fit the screen if you don’t scale them first. This approach is wasteful since you’re consuming memory for portions of the images that won’t be visible.Working with Stream Resources
The sample program Music.java allows the user to display a list of song titles on the television and to select, play, pause, fast forward, and rewind the songs using the TiVo remote control. The user interface for this program is a bare-bones implementation intended for teaching purposes only.
This sample illustrates the following concepts and tasks:
Basic Setup
The init method for the Music application creates the two main views: list and track:
public void init(IContext context) throws Exception{
   super.init(context);
   list = new MusicList(getRoot(), 64, 40, 640 - 64*2,
                        480 - 150, 27);
   track = new Track(getRoot(), 64,
                     list.getY()+list.getHeight()+10,
                     640 - 64*2, 60);

   // populate our list using the files read by the
   // factory
   list.addAll(((MusicFactory)getFactory()).list);

   // Give the list widget focus.
   // Key presses will go to the list by
   // default. If the list doesn't handle the key press,
   // it'll bubble up to the app.
   setFocus(list);
}
The list is a custom list widget created using the HME SDK by subclassing from the BaseList class. (An alternative, and easier approach, would be to use the BList class contained in the Bananas User Interface Toolkit. For more information, see the Bananas UI Toolkit Developer’s Guide.)
The list is the basic user interface for this program. The init method sets the focus to the list view so that it will receive and handle keypress events from the user.
The track view contains the MP3 stream resource that is currently playing. Because this view contains a stream resource, it automatically receives ResourceInfo events for this stream from the Receiver. The track contains the code for playing, pausing, fast forwarding, and rewinding the MP3 stream resource (playTrack, pauseTrack).
After the init method creates the list, it obtains the list of song titles from the Music factory and populates the list with that data.
Music Factory
The Music factory in this example is very similar to the Pictures factory discussed in the previous example. The Music factory finds the list of available music and then shares it among all instances of this application.
The Music factory class in this example overrides two methods from the base class: getStream and addHeaders. The getStream method is called when the Receiver asks for the URI of the stream to play. The Factory converts the URI to a file. It then creates a new input stream for this file and sends the resource to the Receiver. Whenever the Music factory serves up an MP3 file, it also creates a special HTTP header that contains the duration of the file and sends this information to the Receiver as well.
User Interface
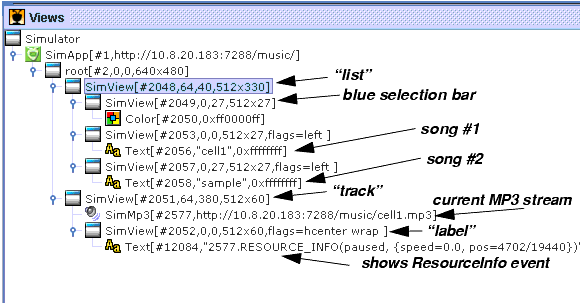
A useful way to examine the views and resources for a program is to run it in the HME Simulator with the Show Views option enabled. Figure 4-1 shows the views and resources for the Music.java sample program. Key elements are the root view and its two direct child views: the list view, which creates the user interface elements, and the track view, which contains the currently playing stream. These views, in turn, contain other child views.
The list widget contains three views, each containing one resource:
Figure 4-1. Show Views window of the HME Simulator showing the Music.java sample program
Track View
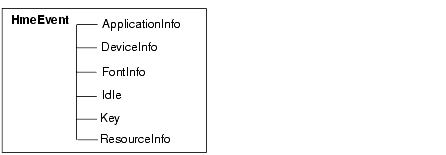
As shown in Figure 4-1, the track view contains the current MP3 stream. It also contains a child view with a text resource named label. As described in Chapter 2 in the section, “Events,” as the stream plays, its container view receives ResourceInfo events generated by the stream. The ResourceInfo class is a subclass of HmeEvent, as shown in Figure 4-2.
Figure 4-2. HmeEvent class tree
In this example, the label view displays the ResourceInfo events as it receives them. The track class handleEvent() method uses the event.toString() method to convert the ResourceInfo event to a string:
//Stuff the events into label.

public boolean handleEvent(HmeEvent event)
{
   label.setResource(createText("default-18-bold.font",
                     Color.yellow,
                     event.toString()),
                     RSRC_HALIGN_CENTER | RSRC_TEXT_WRAP);
   return super.handleEvent(event);
}
The track view then displays the yellow text in the lower portion of the screen as the stream plays. A more sophisticated use of the ResourceInfo event data would be to feed the data into a graphical progress meter that indicates the relative current position in the MP3 stream.
Handling Events
This example shows handling both user-generated events (key presses on the remote control) and system-generated events (information events sent by the Receiver as it plays the stream).
Because the list view has the focus, it receives all events first. If it does not handle an event, the event is sent to the application. In this example, most key presses are handled by the handleKeyPress method, as shown in the next section.
Handling Key Press Events
The application’s handleKeyPress method calls methods on the track class when the user presses keys on the TiVo remote control:
// Handle key presses - play/pause tracks.

public boolean handleKeyPress(int code, long rawcode) {
   switch (code) {
      case KEY_PLAY:
      case KEY_SELECT: {
         play("select.snd");
         play(list.getSelectedIndex());
         return true;
      }

      case KEY_PAUSE: {
         track.pauseTrack();
         break;
      }

      case KEY_SLOW: {
         track.slowTrack();
         break;
      }

      case KEY_FORWARD: {
         track.fastForward();
         break;
      }
      case KEY_REVERSE: {
         track.rewind();
         break;
      }
   }
   return super.handleKeyPress(code, rawcode);
}
Handling Resouce Status Events
As described in Chapter 2, “Processing Streams (ResourceInfo Event),” each ResourceInfo event contains a status code of type EVT_RSRC_STATUS. Your application may want to monitor particular types of status and take appropriate action. The Music application, for example, monitors the closing of the stream (RSRC_STATUS_CLOSED) so that when the stream ends, it can play the next song, as shown here:
public boolean handleEvent(HmeEvent event) {
   switch (event.getOpCode()) {

   // The stream will send resouce info events while it plays.
   // The SDK will automatically generate a synthetic
   // RSRC_STATUS event whenever the status of the stream
   // changes.

   // If the track finishes, start playing the next one.

   case StreamResource.EVT_RSRC_STATUS: {
      HmeEvent.ResourceInfo info=(HmeEvent.ResourceInfo)event;
      if (info.getStatus() >= RSRC_STATUS_CLOSED) {
         // the track finished - what next?

         if (list.size() == 1) {
            playing = -1;
            return super.handleEvent(event);
         }

         // advance
         int index = playing + 1;
         if (index == list.size()) {
            index = 0;
         }

         // if the user hasn't touched the list recently, move
         // the selector to reflect the new track.
         if (System.currentTimeMillis()-lastKeyPress > 5000) {
            list.select(index, true);
         }

         // now play the new track
         play(index);
         }
      return true;
      }
   }
   return super.handleEvent(event);
}
Working with Fonts
The sample program FontInfo.java displays the font metric information sent from the HME Receiver to the application. This program demonstrates how you can use this information to determine the size of a given text string and to accurately position text within a view.
This sample program illustrates a number of key programming tasks:
FontInfo Event
When an application creates a font, it can add an event handler to the view containing the font resource. The Receiver then sends information about the font back to the application in the form of a FontInfo event. As shown in Figure 4-2, the FontInfo event is a subclass of HmeEvent.
The FontInfo event class returns two types of information about the requested font:
Basic Font Metrics
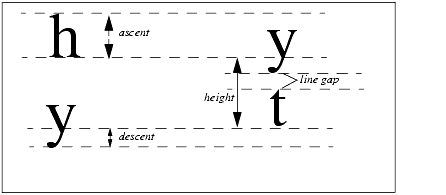
The following metrics are returned for the font as a whole (see Figure 4-3):
- Ascent - distance from the baseline to the top of the ascending characters in the font (such as h, t, l, and f)
- Descent - distance from the baseline to the bottom of the descending characters in the font (such as g and y)
- Height - distance between the baselines of adjacent lines of text (equal to leading + ascent + descent)
- Line gap - same as leading in traditional typographic terms; the distance between two lines of text
Figure 4-3. Basic font metrics
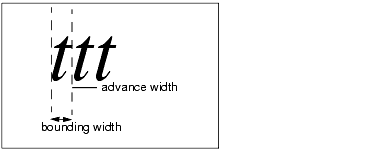
Glyph Metrics
The GlyphInfo class, defined in the FontInfo class, provides the following metrics on a per-glyph basis (see Figure 4-4):
Figure 4-4. Glyph metrics
Application Framework
The application life cycle shown in this example is as follows:
Basic Setup:
Handle Events:
- When a FontInfo event is received, create text to display the font metric information for the requested font.
- Resize the main view vertically to fit this text exactly.
- Create other views and add resources to them (see Table 4-1).
Shut Down:
This program requires no special cleanup. It is all handled automatically.
Basic Setup
The init() method sets up the basic view hierarchy for the application.
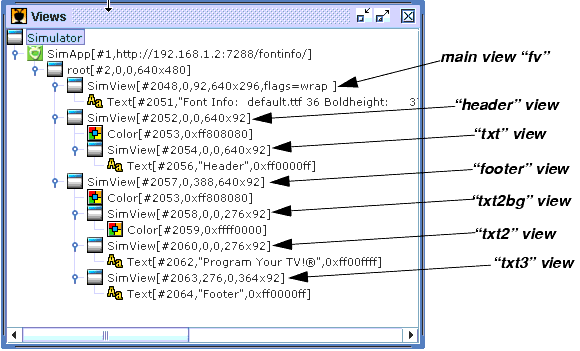
Table 4-1 lists the views created by the FontInfo sample program. Figure 4-5 shows the view hierarchy for this program as displayed in the Simulator. Figure 4-6 shows the application running in the Simulator.
Table 4-1
(main view)Views and Resources for FontInfo Sample Program
Figure 4-5. Show Views window of the HME Simulator showing the FontInfo.java sample program
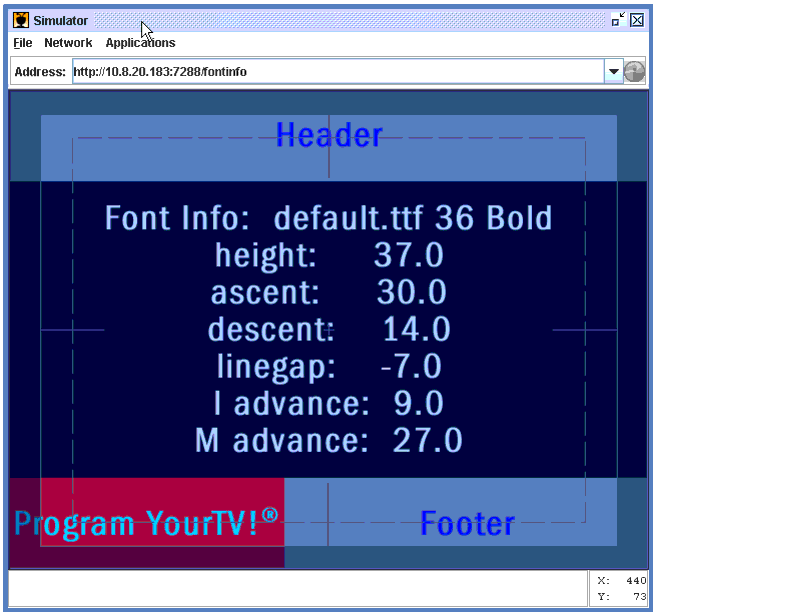
Figure 4-6. Font Info sample application
Here is the init() code for this sample:
public void init(IContext context) throws Exception{
   super.init(context);

   // Create the main view which will display the font info
   View fv = new FontView(getRoot());

   // Create the font and add the view as a listener for its
   // events. Use new font flags to indicate to the receiver to
   // send back metrics for this font
   font = (Resource.FontResource) createFont( "default.ttf",
           FONT_BOLD, 36,
           FONT_METRICS_BASIC|FONT_METRICS_GLYPH );
   font.addHandler(fv);
    }
Handle Events
When a FontInfo event is received (of type EVT_FONT_INFO), the application creates text to display the font metric information for the requested font, as follows:
public boolean handleEvent(HmeEvent event){
   switch (event.getOpCode()) {
      case EVT_FONT_INFO:
         HmeEvent.FontInfo fi = (HmeEvent.FontInfo) event;

       // change the text displayed to contain the font info
       setResource(createText(font, Color.white,
       "Font Info:  default.ttf 36 Bold\n" +
       "height:  " + fi.getHeight()  + "\n" +
       "ascent:  " + fi.getAscent()  + "\n" +
       "descent: " + fi.getDescent() + "\n" +
       "linegap: " + fi.getLineGap() + "\n" +
       "l advance:" + fi.getGlyphInfo('l').getAdvance()+"\n" +
       "M advance:  " + fi.getGlyphInfo('M').getAdvance()
                    ),
                   RSRC_TEXT_WRAP);
Note: The FontInfo is also cached on the Font Resource object. You can access font metric information from the Font Resource object if you have created one explicitly.The handleEvent() method then obtains the height of the font info text and resizes the view to fit the text:
// resize the view vertically to exactly fit the text
int newHeight = (int) fi.getHeight() * 8;
int newY = 240 - newHeight/2;
setBounds(0, newY, 640, newHeight);
Next, handleEvent() creates a header area above the font info text and a footer area below it. Both are sized to fit the space available, calculated using the size of the parent and the height of the font info text:
// create a header view that is sized to the exact top area
// above the font info
View header = new View(getParent(),0 , 0, 640, newY);
header.setResource(Color.gray);
View txt = new View(header, 0, 0, 640, newY);
txt.setResource(createText(font, Color.blue,"Header"));

// create a footer view that is sized to the exact area below
// the font info
View footer = new View(getParent(), 0, newY + newHeight, 640,
                       newY);
The box for the text “Program Your TV!®” is sized using the measureTextWidth() method. The registered trademark symbol is specified using the standard Unicode representation for that symbol (u00ae).
// create a text resource and put in a view that is
// sized-to-fit the width
String someText = "Program Your TV!\u00ae";
int someTextW = fi.measureTextWidth(someText);
Performance Tips
This section offers tips for increasing rendering speed and overall performance. It also lists some hardware constraints you’ll need to take into consideration when creating a user interface for your application.
Rendering Speed
The TiVo box is a sophisticated consumer electronics device, but it is important to remember that it does not have the same graphical horsepower as a modern PC. For most screens, it is possible to render the visible elements using the dedicated graphics hardware built into the device. If the device is unable to render the entire screen using the graphics hardware, it will be forced to render part of the screen in software. Software rendering is much slower than rendering with dedicated graphics hardware.
Here are some things to try if an application seems to be animating slowly (also see “Rendering Constraints,” below):
Enable Debug Rendering
The easiest way to track down performance problems is to turn on debug rendering. To turn on debug rendering while running an HME application, press CLEAR CLEAR THUMBSUP. Enter the sequence again to resume normal rendering.
When debug rendering is enabled, the screen will change to show which portions are using the dedicated graphics hardware and which are rendered in software. The colored rectangles are being rendered by the graphics hardware. The normal pixels are being rendered by the software.
Note: A video background always looks like itself, so you need to know what part is the video background.Rendering Constraints
On Series 2 TiVo boxes, certain hardware constraints cannot be exceeded. HME detects when these limits have been reached and renders those portions of the screen in software.
Hardware rendering constraints include the following:
Note: The maximum depth of 56 bits per pixel means that placing two transparent images on top of each other results in software rendering for the overlapping portions. (Transparent images—which includes any image with at least one transparent pixel or any GIF image—require 32 bits each. Two transparent images would thus require 64 bits, which exceeds the limit of 56 bits per pixel.)Workarounds
To avoid software rendering, use opaque images instead of transparent images. Opaque images require 16 bits and are faster to decode and render. Using transparent images to create shading and texturing effects is costly in this environment and should be avoided. Other related tips include the following:
- Use JPEG images when possible because they’re relatively small, and, because they’re always opaque, the renderer does not have to figure out whether an image includes transparency or not.
- Avoid using images that have large transparent regions. For example, it you want to put a frame around something, it’s much better to break the frame down into the individual components and place them accordingly than to have a single-frame image with a large transparent center.
- Also see the Tech Note on Video Backgrounds. Use of a single-frame MPEG as a background rather than a JPEG or PNG image saves 640kb of memory as well as 16 bits of depth per pixel.
- For large solid-color areas, use color resources rather than images.
Pixel Memory
The TiVo box has a limited amount of memory for managing pixel data. The pixel memory can become fragmented under some circumstances, further limiting the amount of memory available. Remember that a full-screen JPEG requires over 600kb of pixel memory, and a full-screen transparent PNG requires over 1200kb.
Note: A full-screen JPEG takes a minimum of 640 x 480 x 16 bytes of memory, or 600kb. However, the HME SDK performs 10-to-11 scaling, which causes images to be approximately 10 percent larger than the unscaled versions.The rendering framework tries hard to use pixel memory only for elements that are currently on screen. If the TiVo box is unable to allocate enough pixel memory to display an element, that view (or portion of a view) will appear as a black rectangle on screen. This is usually a temporary problem that crops up during intensive memory scenarios such as full-screen cross-fades.
To avoid running out of pixel memory, minimize the use of full- screen images. A cross-fade between two full screen opaque images requires over 1200kb of pixel memory. A cross-fade between two full screen transparent images requires over 2400kb of pixel memory, and is not likely to succeed.
Caching Resources
Whether you use getResource() or createStream() to create image and sound streams depends on whether you’ll be reusing the image or sound. For applications that reuse the stream, such as looping to replay the same sound over and over or displaying thumbnail images of the same photos multiple times, you should call getResource() to create the resource. The getResource() method has the side-effect of caching the stream, so performance improves if you’ll be reusing the data. Another approach for reusing resources is to bundle them in a JAR file.
For one-time use of image or sound data, such as a web camera or a podcasting application, use setResource(createStream). Here is an excerpt from a web-camera application that illustrates loading a series of images for one-time viewing:
// Used to re-fetch the image to get the updated picture

public void run(){

   while (active) {
      try {
      // create the image to the webcam URL
      Resource sr = getApp().createImage(url);
      // set the view to the new resource
      camView.setResource(sr);

      // sleep between refreshes
      Thread.sleep(refreshRate * 1000);

      // remove the old resource to free the memory
      sr.flush();
      sr.remove();
      }
      catch (Exception ex) {
      // if we're unable to update the image, just pass till
      // next time.
      }
   }
}
Removing Resources
Calling view.clearResource() removes a resource from a view but does not delete the resource (it is still available for use by other views). To delete a resource, call <resource>.remove.
|
|